Training Your Autopilot: Assay Pipetting
by
 Recently, we introduced a series called Training Your Autopilot: Mastering Mindless Tasks dedicated to improving laboratory techniques by standardizing the processes of performing experiments. Routine assays can be about as engaging as watching paint dry, but it doesn’t mean we should be careless or sloppy – quite the opposite. So in this installment, we build upon our previous tip and show how to integrate it into our assays.
Many assays are performed in plates (12-well, 96-well, etc.) or in individual eppis. In either case, tracking which wells/tubes have received the proper reagents is key to a successful experiment. Omitting a compound or adding it twice may result in false positives or negatives leading us to the wrong conclusion. We may realize our mistake one hour, one week or one year later- and in any case, that’s just wasted time.
In fact, even with careful attention, it is easy to lose our place on a 96-well plate. So to help us keep track, we can use the tip box as our guide. Which leads us to our next tip:
Always coordinate the tip box with the assay.
Step 1. Start with a fresh box of tips. When setting up an assay, grab a new box that has every single tip in place. This is critical. Even if the box only has two tips missing, either grab a new box, or add two more tips to the box.
Step 2. Set up the assay and decide the order of addition of the assay. If it’s a 96-well plate, orient the plate so that A1 is in the upper left. If it’s a series of eppi tubes, place the tubes in an eppi rack starting in the upper left and moving right.
The order of addition should always be left to right starting in the upper left (see Training Your Autopilot, Tip 1), with 1 exception: 96-well plates. Sometimes due to the mechanics of the plate reader, it makes sense to load samples as columns (top to bottom), not rows (left to right). Regardless, commit to a direction. For that assay, always use that order every time you perform it.
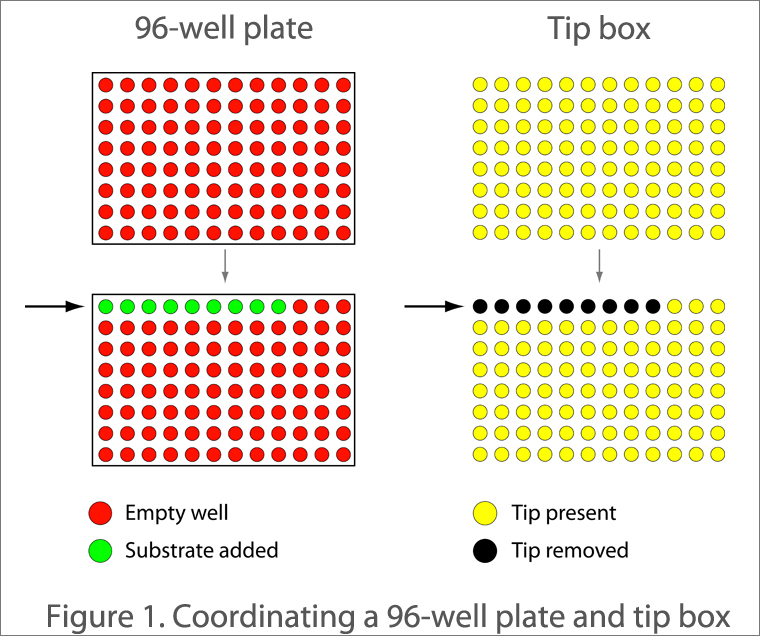
Step 3. To add reagents, use the tip in the box that corresponds to the sample position in the assay. For example, if using a 96-well plate, use the tip in the upper left of the tip box (eg, the “A1 position”) for addition to that well (see Figure 1).
By coupling the tip position and the assay position, we’ve created a physical map of where we’ve been. Should our mind wander and then return a few seconds later, we can be confident in which samples we’ve added because the only tips missing are the ones we used for the assay.
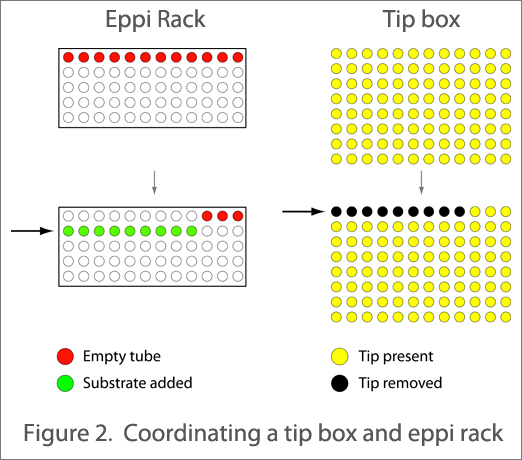
Step 4. If using eppi tubes, after addition of sample to the tube, move the eppi to the row below the rest of the samples (see Figure 2). This is yet another safeguard. In this case, the tip box should tell us exactly where we’ve been and we can confirm this by looking at which eppi tubes remain on the original row.
The importance of training your autopilot is to build in a standardized system that we have full faith in. Something we do every time. Without total confidence in the experimental setup, there is no way to be confident in the result. No confidence in the result means the experiment is useless. A useless experiment is a waste of time.
.
Check out the other articles in this series:
.
Have any suggestions for standardizing routine assays?


13columns
wrote on October 14, 2009 at 3:50 am
i use the tip in figure 2 for a number of techniques- pcr prep, tlc, activity assays. after adding one component, all of the tubes will be in the second row. when adding multiple components (pcr), i move the tubes back up to the first row upon addition of the next component. it's really important to have some physical way to track progress not just in the event you space out, but also in case you get interrupted.
Training Your Autopilot: Mastering Mindless Tasks | BenchFly Blog
wrote on May 20, 2010 at 6:20 pm
[…] Assay Pipetting […]
Training Your Autopilot: When in Doubt, Throw it Out | BenchFly Blog
wrote on May 20, 2010 at 6:25 pm
[…] we’ve discussed in previous installments of Training Your Autopilot (Mastering Mindless Tasks and Assay Pipetting), creating a standard set of operating procedures that we use in every experiment will make us a […]
Send Email Without the Worry: Training Your Autopilot | BenchFly Blog
wrote on August 11, 2010 at 11:16 am
[…] Assay Pipetting […]